The art of painting on glass is an ideal holiday activity for children and adults both. It is simple method to bring some brightness in home. Glass offers an even surface for painting, let’s light to create breath-taking and stunning designs. When you are aware of the right paints to choose and how to use glasses, glass bottles or drinking glasses you’ll be able to begin your glass painting within a matter of minutes.
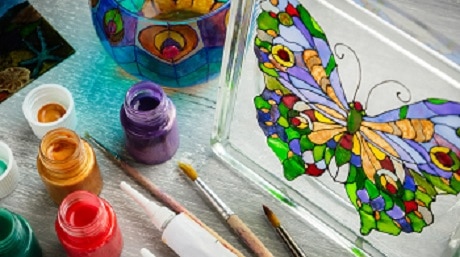
Choose Paint and Brushes for Glass Painting
Step1 – Use enamel paint to create lasting decorations

There are several different kinds of enamel paints that offer different styles of final look. Each one will require some time to fully dry however they should remain at the glass’s surface for an extended time after they’ve set. Here are some different kinds of enamel paints you can pick from:
- Gloss enamel paints provide you with the strongest coat, and will give you an even more opaque finish.
- Glass enamels with a frosty finish offer a light coat to give a hint of color.
- Crystal gloss enamels give you something between.
Step2 – For a, matte look choose acrylic paint and gesso

Pick acrylic paint and gesso to get an elegant, matte appearance. Gesso is a mixture of a binder as well as white powder, which makes almost any surface painted. Apply a base coat of gesso, followed by the topcoats of acrylic paint to achieve the opaquest finish to your glass painting.
Acrylic and gesso paints be most effective on glasses, bottles or other containers that have attractive designs. The effects of painting with acrylic and gesso on a flat sheet of glass can look like a painting canvas.
Step3 – For a simple, stained glass look use glass liner and water-based glass paints

Make use of glass liner and water-based glass paints to create an easy, stained-glass style. Glass liner or lead can create a dark and solid outline that you can then fill with colorful, translucent paints. Drawing an outline, then coloring it in sections can result in stunning, transparent shades that resemble windows made of stained glass.
Draw an outline on the glass before going over it with liner for glass. It’s much simpler for you to cover it with paint or clean off marker than getting rid of the liner!
Step4 – Check for the right paintbrush for your design

Find the perfect paintbrush for your style. You can apply any kind of paintbrush or paint applicator for painting on glass, they can alter the overall appearance of your final creation. There are several kinds of paintbrushes you can choose from:
- Brushes made of synthetic bristles can leave visible brush marks which make your glass appear more natural rustic, natural vibes. You can use these brushes to create smaller, more intricate designs. Natural bristles offer a smoother and uniform coverage. They’re great for applying base coats across the entire face of glass.
- Applicator sponges create a uniform, textured coating on the glass’s surface. Make use of sponges to coat the entire glass or give a slight frosted appearance.
- Use a brush that is the correct size for the painting you are doing. Paintbrushes that are smaller and narrower are ideal for delicate designs, while larger flat brushes are ideal to apply general coats.
Prepare the Surface for Glass Painting
Step1 – Clean and dry the glass surface
Dry and clean the glass’s surface. Make use of warm soap and water to get rid of any fingerprints or oil that may be left on the glass because these could hinder the paint from adhering or spreading evenly over the glass. Be cautious not to leave any additional oil or fingerprints on the glass while you scrub it.
Wear gloves made of latex as you clean the glass to prevent oils from being transferred from your skin to the glass.
To give your skin a thorough cleaning, apply just a small amount of ruby alcohol on a clean sponge instead soap and water.
Step2 – Cover any areas which could come into touch with the mouth
Although the paint that you choose to use is non-toxic, it could break or peel off after repeated use. Apply a strip that is masking tape protect all of the upper of the inch (2.4 cm) of the glass to prevent your hands from painting over it.
Tape can also be used to cover areas that you do not want to cover with paint. Create angled lines on the glass, then painting over them to create cool, clear designs.
Step3 – Painting on glass as a base coat for an all-over shade
Lightly dip the edge of a broad brush in the color of your choice. Paint the entire glass surface with the paint, then use your brush to blend it.
If you are looking for the look of an opaque painting on glass, make use of at least two or three layers of gesso to serve as the initial base coat. After the gesso is dry you can then cover it with the gesso in a layer or two the colour of the paint you prefer.
If you’re looking to add some minor decorations to glass that is otherwise unadorned it is possible to skip this step, and proceed straight to defining your designs in the glass.
Step4 – Allow the base coat to dry for at least one hour
Make sure the paint is completely dry prior to adding paint. This will stop the colours of your intricate designs from spilling in the base coating.
Certain enamel paints will tell that you allow your paint dry between five to seven days. This is required to set the paint however, it’s not necessary when painting multiple coats.
Applying the Paint
Step1 – Draw your design onto your glass for painting
Use a marker to transfer your design onto the glass. Pick a point of departure and then carefully trace the outline of the glass.
You don’t have to be concerned that the marking will ruin your work when you’ve finished. The marker is either covered by the paint or disappear easily.
If you’re employing glass liner you can follow the same process to draw your design out in the bottle. Squeeze the bottle gently as you move it over the outline, laying the liner.
If you did not paint a matte coating on the glass, and it’s completely transparent, you could apply a stencil to an inside surface of your glass, instead of drawing the design on the outside. Draw your design on an unfinished piece of paper and place it on the glass’s interior to serve as a guideline which you can then paint over.
Step2 – Begin painting on glass using one hue
Load a small amount of the color of the paint you want to use onto the tip of your paintbrush. Begin by painting the side closest from the paintbrush and begin to paint the colour on the areas you have chosen in your design.
Start with small strokes and then increase pressure until you have an understanding of the painting process. It’s much easier to add paint than to get rid of it.
If you slip up then use a paper towel to attempt to lift the paint off the glass, while it’s still damp. In the case of enamel paints, it could be helpful to apply a bit of paint thinner. Be sure to only take off those parts that you would like to redo!
Step3 – The brush should be cleaned to eliminate any paint left behind
Dip the end of your brush into one cup of water, then swirl it around to eliminate any paint left behind. Dry the brush on scrap paper prior to choosing the next colour.
If you’re employing enamel paint, you may require some thinner for enamel paint to cleanse your brush. This is usually available from the local craft store next to your enamel paint.
Step4 – Select a different colour and continue glass painting
Place a small amount of paint on the tip of your dry, clean paintbrush, and begin painting. Make sure to ensure that you don’t accidentally mix the colours with those that are still drying in the glass. Repeat this process until the design is completely covered.
If you’re working on intricate designs or worried about ruining your work, allow the first colour to dry before proceeding to the next. After about an hour, it will be dry enough so that you won’t have to be concerned about making a few minor errors.
Step5 – Apply an additional coat if desire that your colour to be noticeable
Once the first coats of paint are dry and cooled, you can evaluate their colour for vibrancy and brightness. If you would like your paint to be more prominent and/or brighter, apply the same methods to give your design an additional coating of colour.
When you apply your second coat, that you paint with exactly the same shade. If the paint appears translucent, then the colours will blend and will likely create a slightly murky result.
Step6 – Make sure to cure your glass painting by allowing the paint to air dry
Certain acrylic and enamel paints only need to long duration to set completely. Keep them warm and dry for at least one week before displaying your glass painted with. Certain paints require washing by hand using warm water and soap.
Step7 – Bake glass to cure painting on Glass
Some paints need baking your glass to cure and set the paint for a lifetime. Place your glass inside the oven and bake the temperature as stated on the bottle of paint. The glass will dry for approximately 30 minutes before turning off the oven and allowing it to cool prior to removing it.
Make sure to place your glass into, remove when the oven is cool. The sudden change in temperatures of glass could make it break.
Suggested Link:
7 Most Popular Types of Painting Techniques - Different Painting
Most Popular Indian Folk Art Forms - Best Painting Style in India